1. The digital artwork has been saved as PSD files (Photoshop documents). If you
do not have Adobe Photoshop and would like to view the images, PhotoFiltre is excellent,
and free. Use Gimp if you want to change the size from 30 inches square to a smaller
size. Or you can just email the links to your local canvas printer and they will
do the rest.

2. If you live in the UK, you might try Exclusive-Art on eBay.co.uk because their
prices are very competitive, (they are sometimes cheaper than the cost of the raw
materials). Their canvases are ‘deep frame’ (30 mm deep) and one can specify the
colour, for example “Red = 38, Green = 49, Blue =53” for the sides of the frame (use
a colour that matches the colour of your wall, but is about 20% darker, so that
it looks like a shadow). Printing instructions to the printer should say: “The face
artwork should be carefully aligned to the wooden frame so that the image is centred
and all the sides are parallel to the frame edges.”
3. The ‘key-lines’ (in a contrasting colour such as yellow or red) that are close
to the edge of the artwork help the printer to mount the canvas onto the wooden frame,
whilst the colour on the outermost edge of the image (in dark grey or black) are
the ‘margin of error ‘ for mounting. The side colour (30 mm) should be a different
shade to these margin pixels.
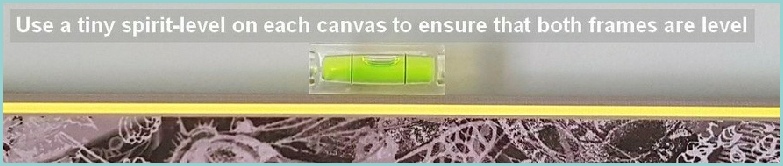
4. When displaying the two canvases on a wall, use the key-lines help to align the
two images, (rather than match the top of the frames), make sure that the key-lines
are exactly the same height and are level. Use two tiny spirit-levels to ensure
the canvases are both exactly level.
5. The middle of two canvases should be at ‘eye-level’ (about 5 foot 3 inches or
about 1.6 meters) from the floor. Each canvas should be hung on a single nail. The
distance between the two nails should be the width of the canvass, plus 3 to 4 inches
(about 75 to 100 mm) for the gap between them. The two nails should be on a line
that is exactly level.
6. Even with the nails exactly level with each other, the horizontal key-lines at
the top on the two canvases may be at slightly different heights, so the lower of
the two should be ‘boosted’ by adding a thin piece of card or wood (e.g. an Ice-lolly
stick) at the back of the frame, under the wood, until the key-lines are at exactly
the same height on both canvases.
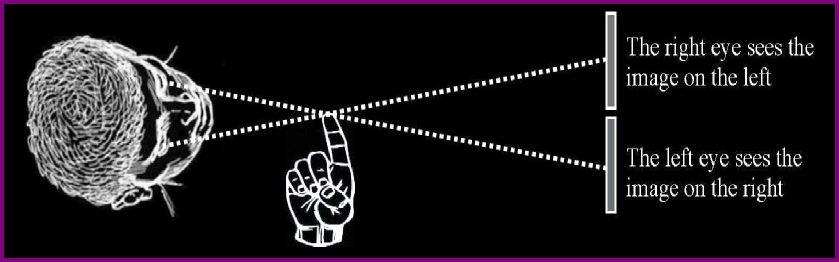
7. When the canvases have the key-lines at the same height and level, then the Phantogram
is ready to view. Stand about 6 foot (1.8 meters) in front of the two canvases, in-line
with the gap between them. Raise the index finger of one hand to about 1 foot in
front of your nose and converge the eyes on your finger, until you can see three
images beyond the finger - the middle one is in 3D.